I got my first police scanner as a gift when I was 11 or 12 years old — a fairly basic Uniden handheld analogue scanner. Since then, many departments have switched to digital systems, for which scanners are a lot more expensive. After discovering the RTL-SDR, I set off to build one on the cheap.
Spoiler: The cheaper part didn’t last long once I was hooked. But hey, it’s more versatile than the commercial ones, so that’s gotta count for something, right?
This post explains my thought process behind this project. If you’re just looking for the parts list or instructions, you can find them on my GitHub.
What exactly is an RTL-SDR?
That’s the same question I asked when I first read the term in the #projects channel of the Framework Discord Server. I knew that an SDR is a device that lets your computer receive or transmit on arbitrary radio frequencies, but I was only familiar with expensive devices like the HackRF.
Well, it turns out that a couple of people figured out that they could use RTL2832U TV tuner chips to manufacture an inexpensive, receive-only SDR, calling it the RTL-SDR. They cost somewhere in the neighborhood of $30-40, depending on which one you get.
Because they’re so cheap, this massive community of hackers has popped up around them. There are blogs and wikis and forums. With a little bit of searching, you can find people using them for everything from signal analysis to aircraft ADS-B tracking (a network of these devices is what’s powering Flightradar24, for example.) The RTL-SDR Blog has a long list of these applications on its about page.
A few of the items on that list caught my eye, inspiring this project:
- Use as a police radio scanner.
- Listening to EMS/Ambulance/Fire communications.
- Listening to aircraft traffic control conversations.
- Scanning trunking radio conversations.
- Decoding unencrypted digital voice transmissions such as P25/DMR/D-STAR.
That $30 looks a lot more appealing than the $400-600 I was looking at for a commercial scanner. The best part? There was no need to go buy from sketchy websites — because of the community around them, there are dozens of slightly different models of these things are right on Amazon!
Cool! Now how do I do it?
I could have plugged an SDR dongle into my laptop and called it a day, but that didn’t feel quite right. I wanted a standalone device that, at the very least, could do everything a commercially-avaliable scanner could. That means monitoring multiple systems and playing them through speakers or a headphone jack. As a bonus, I wanted to record and listen remotely.
Brains
A Raspberry Pi 5 seemed like an obvious choice for the brains. After a bit of searching, it turns out someone already had! Top DNG on YouTube built the SDR Pi. That was a great starting point, and it’s how I found SDRTrunk, the trunking decoder software I used. Looking at SDRTrunk’s requirements, a dual-core CPU and 4GB of RAM are the minimum requirements, with 8GB recommended. I wound up going with the 16GB Raspberry Pi 5 to be on the safe side. Knowing it tends to get toasty, I also installed the active cooler.
Display
There were a few things about the SDR Pi I wanted to improve, starting with the display. The SDR Pi uses a little HDMI touchscreen, so it doesn’t fit in a case and there’s a bunch of extra cables wrapping around the device. In my version, I swapped that out for the Raspberry Pi Touch Display 2. That was where my first mistake came from. It turns out, the v2 touch display has slightly different dimensions and mounting hole locations, in addition to the higher resolution and portrait default orientation.
I bought the SmartiCase Touch Pro 2 to hold everything, but returned it because it only fits the v1 display. As it turns out, nobody is making a case for the v2 touch display yet.
Audio
Not using the HDMI display also meant I had to find a new solution for audio. Unlike earlier models, the Pi 4 and 5 do not have built-in headphone jacks. There are a lot of options out there for little USB DACs, but I decided to get a HAT that connects via GPIO to keep all the USB ports free.
There are a few options out there that have headphone jacks or connectos for speakers, but I wanted something self-contained. I found the RASPIAUDIO Mic+ V3, which has little speakers attached to the board as well as a headphone jack. Perfect.1
Why are there so many SDR options?
I mentioned earlier that there are dozens of slightly different models of RTL-SDRs. For the most part, this project will work with any of them. The first one I bought was a RTL-SDR Blog V4 (the original video used the V3). It works great, but I wound up switching to a different model.
Before buying, I saw that RTL SDRs can tune to any frequency from 24-1766MHz, but I failed to understand that it can’t monitor the whole range at the same time. It can tune to any frequency in that range, but it can only actively listen to a 2.4MHz span (that’s the bandwidth) at once. I had a few different ranges because I want to see multiple police and fire departments, so I needed to buy more SDRs.
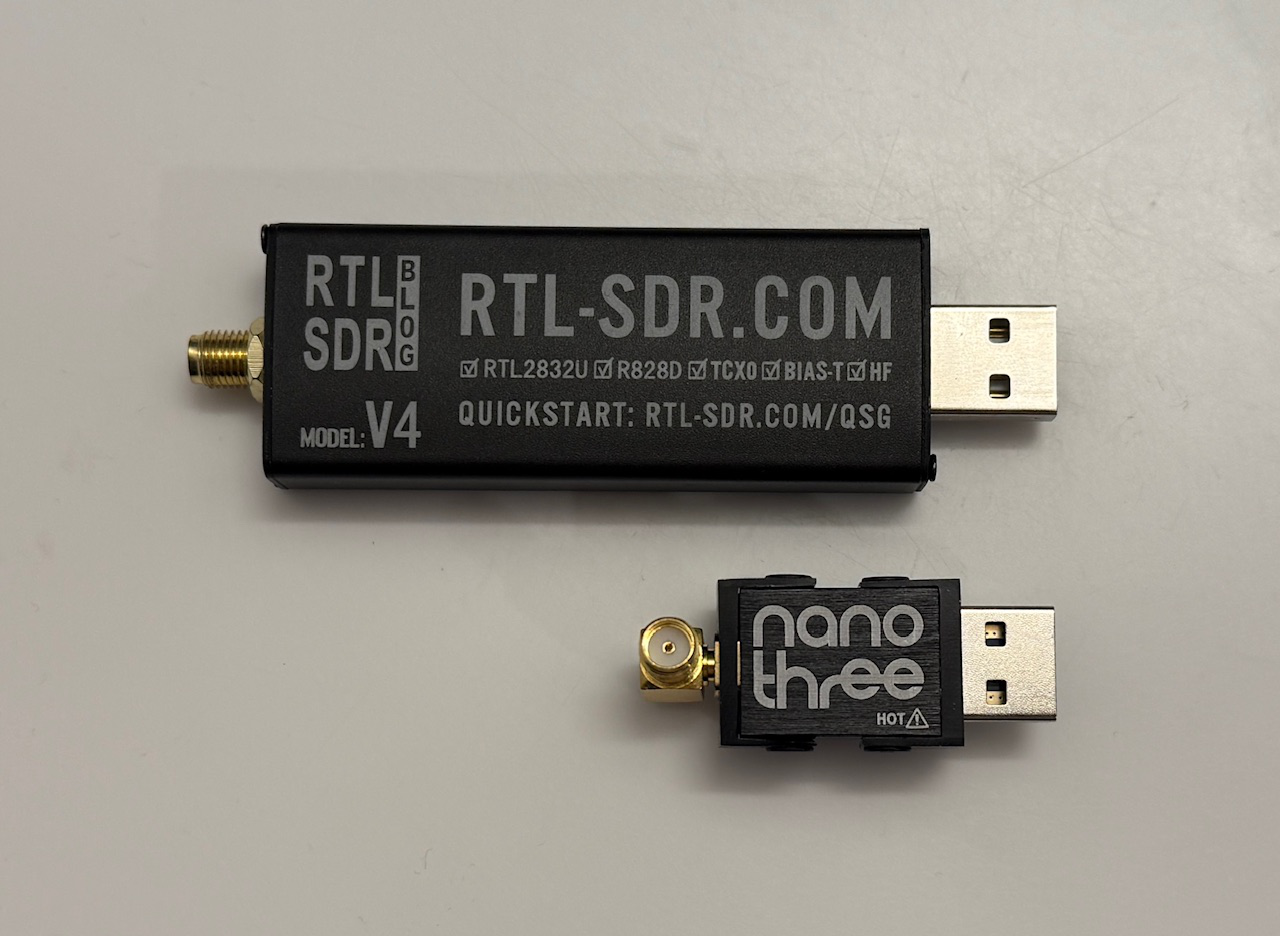
The problem with the Blog v4 is that it’s big. It’s fine, as long as you only need one, but if I added more, I would need to use short USB extensions, which I’d rather avoid. After more searching, I found the Nooelec NESDR Nano 3, which is sized perfectly to fit in a Raspberry Pi USB port, so I can install up to four of them. You can also get them in a two-pack, which comes with antennas, splitters (so one antenna can feed two receivers) and the necessary adapters to convert from SMA antennas to the MCX connector on the SDRs.
I was worried about performance because the nanos are so much smaller, but it appears that there are only a few real differences. First, it uses the smaller MCX connector instead of the larger SMA connector, second it has components on both sides of the PCB instead of just one like the larger SDRs. The biggest difference is thermal mass, though. The larger SDRs are mostly heatsink. The nanos have no internal heatsink — the chips are thermally bonded to the alluminum case, and they come with external heatsinks for you to attach in whatever orientation fits your application. I’ve noticed no performance issues, though it does get very hot.
Software
My scanner uses the same software as Top DNG’s project, SDRTrunk, but I chose to run it in a slightly different environment.2 The original project uses Raspberry Pi OS Lite and runs SDRTrunk directly on top of an X11 instance, without a desktop environment. I wanted the flexibility that comes with a DE, so I used a normal install of Raspberry Pi OS and ran SDRTrunk on top of of labwc.
To make it a bit more applicance-like, I configured the Pi to sign-in and run the app automatically at startup. I also modified the labwc configuration to make sure the main window stays fullscreen and remove the title bar so it’s not taking up excess space.3
With the OS set up, I just had to calibrate the receivers, set the gain level, and figure out the correct squelch setting for the analogue channels. After that process, relatively easy using the Radio Reference database, I could listen to everything locally.
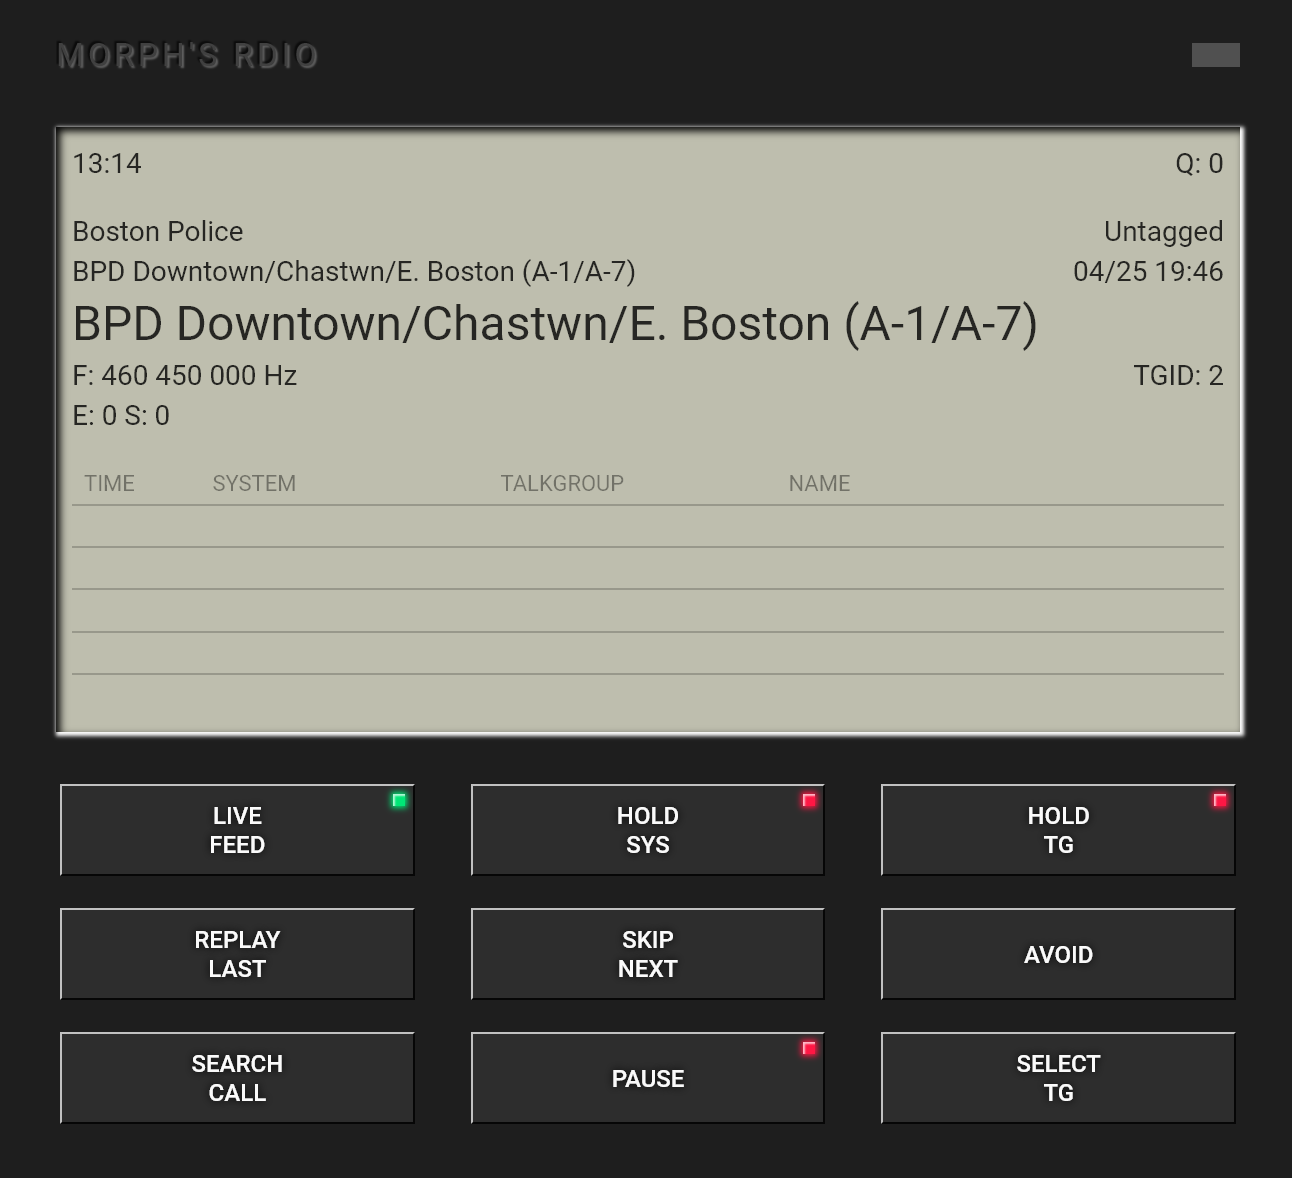
Now for my bonus feature: remote listening. I expected to need to set something up on the scanner itself with Cloudflare tunnels, but it turns out that there’s a pre-built solution for this too. SDRTrunk includes support for streaming to Broadcastify, Icecast and my preference, Rdio. I set up a Rdio instance in a Docker container in my homelab, pointed SDRTRunk to it, and all radio calls get recorded and uploaded to the server automatically.
From wherever I am, I can open the site on my phone and listen to recorded calls, or select channels to hear live, as they come in. It also has settings for retention, so it won’t fill up your storage endlessly recording calls. My instance is set to save calls for 48 hours.
If you don’t want to set up a Rdio server, you can always stream to Broadcastify and tune in remotely via their live feeds, assuming their moderators approve your stream. That approach also gets you free Radio Reference premium, so it might be worth it to do both.
What’s next?
The biggest change I want to make is putting it in a case so I can move it around, and so I don’t have to prop it up haphazardly. An updated version of the SmartiCase Touch Touch Pro has been listed as “coming soon” on SmartiCase’s website since I started this project more than two months ago. Tom, the owner, tells me the first batch of units is in the United States awaiting customs clearance, so hopefully this will be solved very soon.
I would also love to add a battery and make this thing portable. There are a couple companies making HATs for the Pi 5 that hold 18650 Li-ion batteries, but they’re fairly expensive, and I worry about battery life and current draw between the SDRs and the Pi. I’ll probably figure out a solution to this once I have a case for it, but for now, this thing isn’t leaving my desk anyway.
-
This accessory ecosysem is a big reason I went with a Raspberry Pi: There are so many niche, purpose-built accessories out there that you can do just about anything with minimal custom work. ↩
-
SDRTrunk is no doubt the most complete GUI detrunking software out there, but the UI leaves a lot to be desired on a small screen, doubly so when that screen is a touchscreen. Eventually, I plan to fork SDRTrunk and add a simplified UI and a REST API for control. ↩
-
Config for all of this is in the project’s GitHub repo. ↩